红黑树概述
历史上 AVL 树流行的另一变种是红黑树(red-black tree)。对红黑树的操作能保证在最坏情况下动态几何操作的时间为 O(logN) 。之前介绍过AVL 树,该树都是在进行插入和删除操作时通过特定操作保持二叉查找树的平衡,从而获得较高的查找性能。但 RB-Tree 出来之后,便很少有应用场合用到 AVL 。
这里在探索STL源码时学习红黑树的,由于STL中的关联式容器默认的底层实现都是红黑树,以及 Linux 内核中包括进程队列等结构也是基于红黑树的。所以有必要掌握红黑树的实现原理和源码实现。
红黑树是二叉查找树,但在每个节点上增加了一位存储位表示该节点的颜色,具体可以是 RED 或 BLACK。通过对任一条从根到叶子的路径上各节点着色方式的限制,红黑树确保了没有一条路径会比其他路径长到两倍,因而基本上是平衡的。它所追求的的是局部平衡而不是AVL树中的非常严格的平衡。
红黑树在二叉查找树的基础上还必须满足以下着色规则:
- 每个节点不是红色就是黑色
- 根节点为黑色
- 如果节点为红,其子节点必须为黑(一条路径上不能出现连续的两个红色节点)
- 任一节点至NULL(树尾端)的任何路径,所含之黑节点数必须相同
根据规则4,新增节点必须为红;根据规则3,新增节点之父点必须为黑。当新节点根据二叉查找树的规则(键值大小)到达其插入点,却未能符合上述条件,就必须调整颜色并旋转树形。AVL 树插入节点后如果不满足其平衡条件,需要旋转树形。红黑树并不是基于 AVL 树的,它是在二叉查找树的基础上。
那么红黑树的基本平衡又是如何保证的呢?红黑树的着色法则,根据上面的规则,一条路径上不能出现连续的两个红色节点,必须有黑色节点间隔开来,然后红黑树的每条路径中所含黑色节点的数目必须相同,这样就限制每条路径之间的高度差,从而达到接近平衡的目的。
\插入节点**
同 AVL 树,红黑树的插入也要考虑以下几种情况,然后兼顾上面的着色法则。所有待插入节点初始着色为红色,最后将根节点重新设置为黑色。
1、空树
这是最简单的一种形式,直接添加,着色为黑色(规则2)
2、仅存在根节点(黑色),或待插入节点 X 的父节点 P 为黑色
直接添加即可,无需任何旋转和调整颜色。这种情况下,直接添加满足所有的着色法则,不用理会其叔节点的特征。
3、待插入节点 X 的父节点 P 为红色,且该父节点 P 为X 祖父节点G 的左儿子
这种情况下,又分为几种情况:
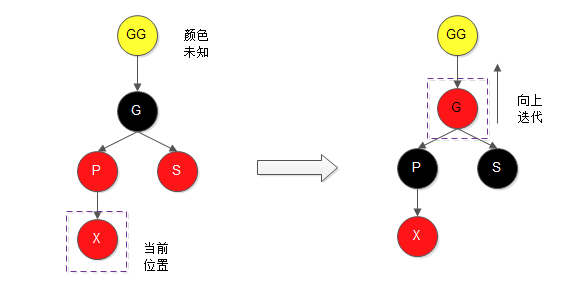
3.1、X 的叔节点 S 为红色,(X 的叔节点就是 X 的祖父节点的右儿子)
此时存在红- 红的情况,父子节点同时为红色,不满足着色法则3,需要作出调整。
调整策略就是:将X 节点的父节点和叔节点着黑色,将其祖父节点着红色,这样该局部满足着色法则,但是尚不清楚其曾祖父GG节点的颜色,如果GG为红色,由于G也为红色,这样就不满足着色法则3,仍需要调整;如果GG为黑色就不需要调整了,这里的调整策略便是向上迭代调整,就是向上更换当前位置(将原当前位置X,设置为X的祖父节点G),再进行同等判断调整。如下图:
3.2、X 的叔节点 S 为黑色(NULL认为是黑色节点)
红黑树还有个规则就是NULL节点一律看作是黑节点,如某节点K 的右儿子不存在,即该右儿子看作是黑色节点,这个不影响着色法则。
叔节点S 为黑,这样就需要通过旋转和改变颜色来调整了,通过之前的 AVL 树,我们知道外侧插入和内侧插入的旋转不一样,外侧插入(这里的左左)只需单旋转,而内侧插入(左右)则需要双旋转。
3.2.1、先看看外侧插入,即待插入节点X 为其父节点的左儿子
这种情况下,需要进行单旋转然后调整颜色。关于外侧插入的旋转已经在AVL树中介绍,这里是相似的,不再赘述。实现细节看图便知

调整前后局部根节点还是黑色,也就是这种情况下只需要局部调整颜色然后单旋转即可,不需要向上迭代
3.2.2、内侧插入,即待插入节点X 为其父节点的右儿子
该情况下,需要先进行左旋转,然后调整颜色,然后再次进行右旋转即可,前后局部根节点依旧为黑色节点,同样不需要考虑上一层的红-红问题,实现细节如下图:

上述第3点考虑的是待插入节点的父节点 P 为X 祖父节点G 的左儿子的情况,其作为右儿子也是类似的操作,差别在于旋转的先后顺序上,同AVL树的旋转调整。这里也顺便贴出来,见第4点
4、待插入节点 X 的父节点 P 为红色,且该父节点 P 为X 祖父节点G 的右儿子
同样分为以下几种情况,由于与第3点是对称性结构,这里就简单的贴图说明:
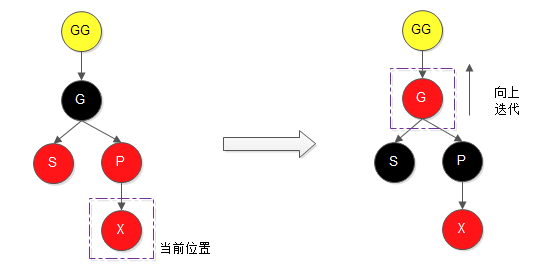
4.1、X 的叔节点 S 为红色,(X 的叔节点就是 X 的祖父节点的左儿子)
具体说明参见3.1。同样需要解决红-红(父子节点同时为红色)的问题,调整位置向上迭代判断调整
4.2、X 的叔节点 S 为黑色(NULL认为是黑色节点)
也是需要考虑外侧插入和内侧插入的情况
4.2.1、外侧插入,即待插入节点X 为其父节点的右儿子

4.2.2、内侧插入,即待插入节点X 为其父节点的左儿子

以上便是红黑树插入节点的所有情况。
下面我们通过STL的源码来剖析上述过程:
先看看两个关键函数:\左旋转和右旋转**
左旋转*\*:**
****
1
2
3
4
5
6
7
8
9
10
11
12
13
14
15
16
17
18
19
20
|
inline void
__rb_tree_rotate_left(__rb_tree_node_base* x, __r_node_base*& root)
{
__rb_tree_node_base* y = x->right;
x->right = y->left;
if (y->left != 0)
y->left->parent = x;
y->parent = x->parent;
if (x == root)
root = y;
else if (x == x->parent->left)
x->parent->left = y;
else
x->parent->right = y;
y->left = x;
x->parent = y;
}
|
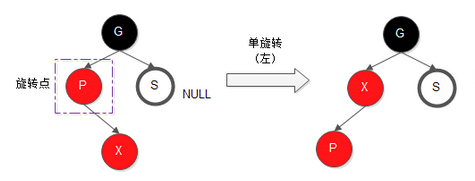
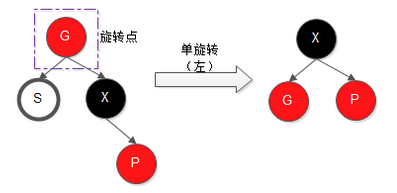
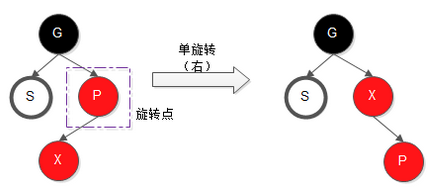
其旋转过程参见下图:
 &
& 
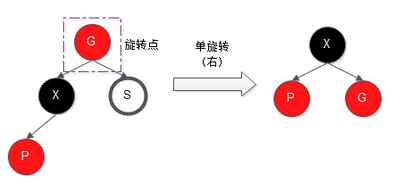
右旋转:
1
2
3
4
5
6
7
8
9
10
11
12
13
14
15
16
17
18
19
20
|
inline void
__rb_tree_rotate_right(__rb_tree_node_base* x, __rb_tree_node_base*& root)
{
__rb_tree_node_base* y = x->left;
x->left = y->right;
if (y->right != 0)
y->right->parent = x;
y->parent = x->parent;
if (x == root)
root = y;
else if (x == x->parent->right)
x->parent->right = y;
else
x->parent->left = y;
y->right = x;
x->parent = y;
}
|
旋转示意图如下
 &
& 
有了前面的旋转函数,接下来来看看STL中红黑树插入节点后的\平衡调整函数**:
1
2
3
4
5
6
7
8
9
10
11
12
13
14
15
16
17
18
19
20
21
22
23
24
25
26
27
28
29
30
31
32
33
34
35
36
37
38
39
40
41
42
43
44
45
46
47
48
49
50
51
52
53
54
55
56
57
58
59
|
inline void
__rb_tree_rebalance(__rb_tree_node_base* x, __rb_tree_node_base*& root)
{
x->color = __rb_tree_red;
while (x != root && x->parent->color == __rb_tree_red)
{
if (x->parent == x->parent->parent->left)
{
__rb_tree_node_base* y = x->parent->parent->right;
if (y && y->color == __rb_tree_red)
{
x->parent->color = __rb_tree_black;
y->color = __rb_tree_black;
x->parent->parent->color = __rb_tree_red;
x = x->parent->parent;
}
else
{
if (x == x->parent->right)
{
x = x->parent;
__rb_tree_rotate_left(x, root);
}
x->parent->color = __rb_tree_black;
x->parent->parent->color = __rb_tree_red;
__rb_tree_rotate_right(x->parent->parent, root);
}
}
else
{
__rb_tree_node_base* y = x->parent->parent->left;
if (y && y->color == __rb_tree_red)
{
x->parent->color = __rb_tree_black;
y->color = __rb_tree_black;
x->parent->parent->color = __rb_tree_red;
x = x->parent->parent;
}
else
{
if (x == x->parent->left)
{
x = x->parent;
__rb_tree_rotate_right(x, root);
}
x->parent->color = __rb_tree_black;
x->parent->parent->color = __rb_tree_red;
__rb_tree_rotate_left(x->parent->parent, root);
}
}
}
root->color = __rb_tree_black;
}
|
有了前面的介绍,相信不难理解这个程序。上面便是红黑树插入节点后的核心部分程序
再来看看红黑树的插入函数,在了解红黑树的插入操作之前,有必要先了解红黑树的数据结构以及构造和内存管理
先看看\红黑树的节点结构**
1
2
3
4
5
6
7
8
9
10
11
12
13
14
15
16
17
18
19
20
21
22
|
struct __rb_tree_node_base
{
typedef __rb_tree_color_type color_type;
typedef __rb_tree_node_base* base_ptr;
color_type color;
base_ptr parent;
base_ptr left;
base_ptr right;
static base_ptr minimum(base_ptr x)
{
while (x->left != 0) x = x->left;
return x;
}
static base_ptr maximum(base_ptr x)
{
while (x->right != 0) x = x->right;
return x;
}
};
|
接下来红黑树rb_tree 的类体结构,由于比较大,这里只摘取相关部分
1
2
3
4
5
6
7
8
9
10
11
12
13
14
15
16
17
18
19
20
21
22
23
24
25
26
27
28
29
30
31
32
33
34
35
36
37
38
39
40
41
42
43
44
45
46
47
48
49
50
51
52
53
54
55
56
57
58
59
60
61
62
63
64
65
66
67
68
69
70
71
72
73
74
75
76
77
78
79
80
81
82
83
84
85
86
87
88
89
90
91
92
93
94
95
96
97
98
99
100
101
102
103
104
105
106
107
108
109
110
111
112
113
114
115
116
117
| template <class Key, class Value, class KeyOfValue, class Compare,
class Alloc = alloc>
class rb_tree {
protected:
typedef void* void_pointer;
typedef __rb_tree_node_base* base_ptr;
typedef __rb_tree_node<Value> rb_tree_node;
typedef simple_alloc<rb_tree_node, Alloc> rb_tree_node_allocator;
typedef __rb_tree_color_type color_type;
public:
……
typedef rb_tree_node* link_type;
protected:
link_type get_node() { return rb_tree_node_allocator::allocate(); }
void put_node(link_type p) { rb_tree_node_allocator::deallocate(p); }
link_type create_node(const value_type& x)
{
link_type tmp = get_node();
construct(&tmp->value_field, x);
}
link_type clone_node(link_type x)
{
link_type tmp = create_node(x->value_field);
tmp->color = x->color;
tmp->left = 0;
tmp->right = 0;
return tmp;
}
void destroy_node(link_type p)
{
destroy(&p->value_field);
put_node(p);
}
protected:
size_type node_count;
link_type header;
Compare key_compare;
link_type& root() const { return (link_type&)header->parent; }
link_type& leftmost() const { return (link_type&)header->left; }
link_type& rightmost() const { return (link_type&)header->right; }
static link_type& left(link_type x) { return (link_type&)(x->left); }
static link_type& right(link_type x) { return (link_type&)(x->right); }
static link_type& parent(link_type x) { return (link_type&)(x->parent); }
static reference value(link_type x) { return x->value_field; }
static const Key& key(link_type x) { return KeyOfValue()(value(x)); }
static color_type& color(link_type x) { return (color_type&)(x->color); }
static link_type minimum(link_type x) {
return (link_type)__rb_tree_node_base::minimum(x);
}
static link_type maximum(link_type x) {
return (link_type)__rb_tree_node_base::maximum(x);
}
private:
iterator __insert(base_ptr x, base_ptr y, const value_type& v);
link_type __copy(link_type x, link_type p);
void __erase(link_type x);
void init() {
header = get_node();
color(header) = __rb_tree_red;
root() = 0;
leftmost() = header;
rightmost() = header;
}
public:
rb_tree(const Compare& comp = Compare())
: node_count(0), key_compare(comp) {
init();
}
rb_tree(const rb_tree<Key, Value, KeyOfValue, Compare, Alloc>& x)
: node_count(0), key_compare(x.key_compare)
{
header = get_node();
color(header) = __rb_tree_red;
if (x.root() == 0)
{
root() = 0;
leftmost() = header;
rightmost() = header;
}
else
{
root() = __copy(x.root(), header);
leftmost() = minimum(root());
rightmost() = maximum(root());
}
node_count = x.node_count;
}
~rb_tree()
{
clear();
put_node(header);
}
rb_tree<Key, Value, KeyOfValue, Compare, Alloc>&
operator=(const rb_tree<Key, Value, KeyOfValue, Compare, Alloc>& x);
……
};
|
这里对上面的 header 节点说明一下,树状结构的各种操作,最需注意的就是边界情况的发生,也就是走到根节点是要有特殊的处理,这里STL 特别为根节点再设计了一个父节点 header,而当插入节点后,header 的父节点指向根节点,其左子节点指向树的最小节点,右子结点指向树的最大节点。类似于链表的表头,这里也多了个头节点不实际存储数据,为管理而存在。

也就是在一棵非空红黑树中,header->parent 就是指的该树的根节点,header->left 就是指该树的最小节点,header->right 就是指该树的最大节点。
有了前面的了解,接下来看看红黑树的插入操作。
1
2
3
4
5
6
7
8
9
10
11
12
13
14
15
16
17
18
19
20
21
22
23
24
25
26
27
28
29
30
31
32
33
34
35
36
37
38
39
40
41
42
43
44
45
46
47
|
template <class Key, class Value, class KeyOfValue, class Compare, class Alloc>
pair<rb_tree<Key, Value, KeyOfValue, Compare, Alloc>::iterator, bool>
rb_tree<Key, Value, KeyOfValue, Compare, Alloc>::insert_unique(const Value& v)
{
link_type y = header;
link_type x = root();
bool comp = true
while (x != 0)
{
y = x;
comp = key_compare(KeyOfValue()(v), key(x));
x = comp ? left(x) : right(x);
}
iterator j = iterator(y);
if (comp)
{
if (j == begin())
return pair<iterator, bool>(__insert(x, y, v), true);
else
--j;
}
if (key_compare(key(j.node), KeyOfValue()(v)))
return pair<iterator, bool>(__insert(x, y, v), true);
return pair<iterator, bool>(j, false);
}
template <class Key, class Value, class KeyOfValue, class Compare, class Alloc>
rb_tree<Key, Value, KeyOfValue, Compare, Alloc>::iterator
rb_tree<Key, Value, KeyOfValue, Compare, Alloc>::insert_equal(const Value& v)
{
link_type y = header;
link_type x = root();
while (x != 0)
{
y = x;
x = key_compare(KeyOfValue()(v), key(x)) ? left(x) : right(x);
}
return __insert(x, y, v);
}
|
从上面可知,真正的插入操作是\__insert()**
1
2
3
4
5
6
7
8
9
10
11
12
13
14
15
16
17
18
19
20
21
22
23
24
25
26
27
28
29
30
31
32
33
34
35
36
37
|
template <class Key, class Value, class KeyOfValue, class Compare, class Alloc>
rb_tree<Key, Value, KeyOfValue, Compare, Alloc>::iterator
rb_tree<Key, Value, KeyOfValue, Compare, Alloc>::
__insert(base_ptr x_, base_ptr y_, const Value& v) {
link_type x = (link_type)x_;
link_type y = (link_type)y_;
link_type z;
if (y == header || x != 0 || key_compare(KeyOfValue()(v), key(y)))
{
z = create_node(v);
left(y) = z;
if (y == header)
{
root() = z;
rightmost() = z;
}
else if (y == leftmost())
leftmost() = z;
}
else
{
z = create_node(v);
right(y) = z;
if (y == rightmost())
rightmost() = z;
}
parent(z) = y;
left(z) = 0;
right(z) = 0;
__rb_tree_rebalance(z, header->parent);
++node_count;
return iterator(z);
}
|
以上就是红黑树的整个节点插入操作过程
&
&